Saturday, January 12, 2013

Birthday Monster


Now that most people know that we are expecting another little one in May, I guess I can start blogging again. And just in time - Addison turned 2 on Monday.  I haven't a clue why, but most toddlers seem absolutely enamored with Elmo, and Addison is no exception. So, for her birthday party I decided to make her Elmo cupcakes. I think they turned out pretty good for a first try.


Since red frosting is next to impossible to make, I made homemade buttercream frosting and with a lot of red food coloring managed to get it to a dark pink. To make him look furry, I topped each cupcake with red sugar sprinkles. The eyes are marshmallows I cut in half, and stuck a chocolate chip to the sticky side. The nose is half of a marshmallow that I had previously rolled in yellow food coloring and let dry. To make sure everything stuck to the cupcake, I put the eyes, nose, and chocolate chip mouth on before the frosting had time to set, and then applied the sprinkles last.

Although there were a lot of steps, none of them were too difficult, and the finished products were a hit. Addison had a great time playing with her friends, although she got a bit shy when everyone sang "Happy Birthday" to her.

And now the holidays are over, birthday was a success, and we can relax into the normal routine again. Ha, whatever that means.  

Monday, August 6, 2012

Kids say the Darndest things


If you've met me or my husband, you know that we have slightly different social styles. More often than not, I bound into a crowd and strike up a conversation while Derek hangs back and observes the crowd rather than burst out in speech. And supposedly he was like this as a child as well - apparently Derek wasn't early to talk, but when he did it became apparent that he'd been paying attention. According to his mother, he went from barely speaking to "Can I have some pancakes?" and other full sentences.

Well, it seems that Addison is taking after her dad rather than after me. Ever since she was born, she's been a watcher. Even in the delivery room, she seemed to be watching us just trying to figure things out before she decided what to say. And as she's grown, she still seems to take a few minutes in any situation before she is willing to socialize. And as for talking? She definitely takes after Derek there.

Addison may have been an early walker, but she's been a little slow to pick up speech. Granted she talks up a storm in baby-speak, but when it comes to English she only have a few words. At the moment both Derek and I are still "mommy" as are several other people and most animals. I'm pretty sure Derek will jump for joy the day she says "daddy."

However, despite only saying a few words (mommy, uh-oh, wow, hi, bye-bye), in the last few weeks she's started uttering sentences. One night as I was cooking dinner, she out of the blue pointed at the pan and asked, "what is it?" We were pretty shocked. And then the next day she added, "what is it called?" and "where is it?" to her repertoire.

It's amazing watching her grow up and develop. I'm sure a lot of things miss our attention, but the things that we do notice often blow us away. And she's only just over 18months old! I'm a little nervous to see what she'll surprise us with in the next 18.

As Derek is away on a work trip at the moment, I'm not very inspired to cook. It's always more difficult to cook for 1 (or even 1 and a half) than it is to cook for a crowd. So while he's gone, the only thing I've cooked up so far is pea soup. So, here's the pea soup recipe... I make it in my crock pot, so the kitchen stays relatively cool on these hot August days. Enjoy.

Slow-Cooker Pea Soup
1 bag dried split peas
6 strips bacon, sliced into 1/2" pieces
4 carrots, diced
1/2 onion diced
2 cloves garlic, minced (I use a garlic press)
2 Tbsp Worcestershire sauce
1 tsp chicken bullion
2 bay leaves
6 cups water

1. Cook bacon in skillet as you normally would until almost burned. Transfer to crock pot

2. Add everything else to crock pot. Stir once, then cover. Cook for 4-6hrs on high or 8-10hrs on low.

3. Stir to mush up peas and season with salt/pepper to taste. Enjoy!


Sunday, July 22, 2012

Oil and water


Coming from Santa Barbara, you would think that I'd be rather tolerant of tap water. On the contrary, I'm pretty sure it has made me very sensitive to flavors in the water, and therefore I rarely drink water directly from the tap anywhere.

Granted, I did grow up in Portland, OR where I think the water directly from the tap is rather tasty (aka has no taste at all). Unlike Santa Barbara where the water was claimed to kill house plants (either that or my green-gone-black thumb). Then again, I don't much care for the tap water here in Huntsville either. Here it doesn't have that mineral flavor that SB does, but it tastes a bit too much like a swimming pool with all the chlorine.


So, it was a nice surprise that our house already had a reverse osmosis eater purifier built into the kitchen sink. Even though I prefer my water super ice cold, I could tolerate Luke-warm water directly from the tap with this system. Until it sprung a leak....

Yes, Derek and his good hearing detected that there was a constant drip coming from the water filter and it miraculously went away as soon as we turned off the water source headed to that part of the sink. Bummer. Because that means that until we figure out exactly what is leaking and why, I have to make do with regular tap water.


Due to this lovely turn of events, I find that in the past week (while the water filter has been off) I've consumed a lot more milk, soda, tea, apple juice, and beer. All because I'm thirsty and really can't quite convince myself to drink chlorine water. I wonder how long it will take me to get over my aversion.... Probably longer than it will take to run out of juice and beer and milk, or fix the leak.


Now in an attempt to take all our minds off liquids, here is a recipe for homemade French bread. I've only tried it once, and have a few minor adjustments I'll try next time, but overall it was a success. Very crunchy crust with a good flavor and perfect for dipping into your favorite EVOO and balsamic vinegar mixture. Just thinking about it makes my mouth water.

French Bread
5 1/2 cups flour
2 cups warm water (hot tap water)
2 packets active dry yeast
2 Tbsp sugar
1 1/2 Tbsp salt
1 egg + 2 Tbsp water (egg wash)
Cornmeal (for dusting)

1. Combine sugar, water, and yeast in a kitchen mixer with a bread hook. Mix on low for 2 minutes to dissolve.

2. Add flour and salt. Mix for 10 minutes on med-high until dough comes away from the sides and starts to inch up the bread hook.

3. Rub olive oil in a mixing bowl. Turn dough into bowl and cover with plastic wrap. Put in a warm dark area for approx 2 hrs (until dough has at least doubled in size).

4. Turn dough out onto a heavily floured surface. Separate into equal portions (depending on how large of loaves you want).

5. Take each piece and spread it into a rectangle. Roll the dough, pressing the roll into the flat dough every once in a while to ensure the air is sealed in. Once rolled up, press seams to ensure seal (this makes it extra fluffy).

6. Place finished rolls on a cooking sheet or baking tray that has been dusted with cornmeal. Dust tops of loaves with cornmeal and cover with a dish towel. Let rise for 1 hr.

7. Take a knife and slice diagonal cuts through the top of the loaves approx 1 inch apart.  Brush egg wash over loaves (make sure to get the sides too).

8. Bake at 350 for 30 - 45 minutes until golden brown in color. Let cool for a few minutes before slicing and eating. Yum!  


Saturday, July 7, 2012

Stripes, Sweat, and Sheers

When it's over 100 degrees outside for several days in a row (going on 10 I think), there is no way that I'm going to get outside to do anything other than water my wilting garden, and maybe splash around in the pool with Addison. As much as I'd like to keep the landscaping and planting going while I have some inspiration, the temperatures are quite forceful in their quest to keep me indoors.

So, back to the house projects I run.

Now I've heard many people say that if you're redecorating or renovating your house, you should do your bedroom first. That way you have a relaxing sanctuary to escape to, whatever renovation projects lay partially done in the rest of the house. Well, we didn't quite follow that mantra. Addison's nursery was my first priority, and that appears to be the only finished (almost) room of the house. But in an attempt to follow the spirit of the saying, I pushed that we tackle our bedroom next.

When we moved in, I thought that I liked the pale green that was on all the walls of every room. Unfortunately I soon discovered how dirty and old the paint was, which turned pale green into beige-meets-avocado; not a very pleasant color after all.

BEFORE
AFTER
And this color was in our bedroom as well as the master bathroom, dining room, living room, foyer, and hallway. Yuck. Oh, and did I mention that the exterior of our house is the same color? At least beige-meets-avocado isn't so terrible looking outdoors.

So bit by bit I plan to rid the entire inside of the house from this awful tired color. And I couldn't wait to paint our bedroom. I only can find one "before" picture, which was taken right after moving in, so please ignore the mess. But you get the idea that the room lacked character and personality, and looked... tired. As our bedroom is a good size and has 3 windows that let in a lot of light, we decided to go with a bold and somewhat darker color. The green that we chose is called Manchester, and is a little more blue than Kelly green, but not by much. It's certainly a statement (and we may have to paint over it before we move), but I love it.

AFTER
To give a little personality to the walls, Derek designed a stripe pattern for one wall that reminds me of a pinstripe jacket, alternating the Manchester green with a darker green as you can see in the photo. Paired with some white and black sheer drapes that I made, the room now has a modern flare and really feels like ours.

Now I just have to find some artwork for the walls...

Since in this hot weather, there's nothing like a cool crisp salad with fresh basil, here is my favorite Caprese salad. The measurements are approximate, so season as you like it. This is a hit at any potluck, picnic, or dinner. And for a twist, dice the cheese & tomatoes instead of cubing them, and serve with toasted french bread pieces as a do-it-yourself Bruschetta. Yum!!

Caprese Salad

1/4 cup fresh Basil (chiffonade)
1 cup fresh mozzarella (cubed)
1 cup tomatoes (cubed)
Extra virgin olive oil
Balsamic vinegar
2 cloves garlic (minced/pressed)
salt & pepper

1. Once you have cubed the cheese and tomatoes, mix in the basil and garlic. Toss to combine

2. Drizzle with EVOO and balsamic vinegar to your taste. For me this is usually 1/4 cup EVOO and 1/8-1/4 cup vinegar. Season with salt & pepper. Enjoy!

Wednesday, June 27, 2012

Farm fresh beets


Living in Alabama, the produce selection at the grocery stores and farmers markets is a bit different than what we are use to back in California. Santa Barbara is home of the avocados, which aren't as prevalent around here - and when you can find them they are often much smaller and a lot more expensive than they were in SB. But, other things are available around here that we hadn't ever considered eating on the West Coast. Greens, for example, are a staple in most people's diets. Also Fried Green Tomatoes are a tasty appetizer and not just a movie title as I originally thought.

So even though we moved to the Deep South, home of Fried Everything, we are discovering that we can find plentiful nutritious foods to incorporate into our diet. And this summer we're trying out a new way to do that.

In an attempt to eat better, we've decided to do a CSA this summer. CSA stands for Community Support Agriculture, and is essentially where you buy a share of a farmer's produce. Instead of buying veggies at the market, or the farmers market, we go and pick up a box of veggies each week from the local farmer. Our farm is Doe Run Farms, located just north of us in Tennessee. They have an agreement with other area farmers, so they combine their crops and then pass out boxes of mixed veggies (and some fruit) to everyone who has signed up for a share.

We have a mini-share, which is one peck (yes, like Peter Piper and his pickled peppers), although a full share is one bushel. So, each Thursday we pick up a fresh box overflowing with produce from the farm truck. It's very cool, and forces us to be a bit more creative about what we eat while being very fresh at the same time. And it's so many vegetables! Last week we got the following:
cucumbers

carrots
lettuce
eggplant
green beans
zucchini
zephyr squash (similar to zucchini just half yellow and half green)
peaches
beets

The amount is so much that we have to consciously work to eat them all before the next box arrives. And when something is in season, like beets, we eat a lot of them. Since I love beets, and I know some people aren't quite sure how to eat them, I thought I'd share. They're very sweet tasting, extremely good for you, and take almost no effort to make.


Beets

Beets come in red, golden, or even rainbow as these were. To me, they all taste the same, so I prepare them all the same. No seasoning needed - just cook and eat!
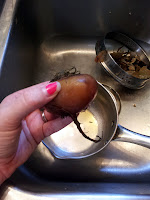


1. Take beets and cut the greens off, about 1/4inch from the end. Rinse thoroughly in water, but leave the skin on. Put all beets in a pot and cover with water. Bring to a boil.
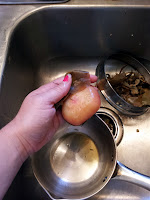


2. After 30 - 45 minutes, check by poking with a fork. If they seem tender (think mashed potatoes), they are done. Remove from heat, drain, and fill with cold water.


3. Once cooled enough to handle, simply rub and the skins will fall off. Rinse to make sure all bits are removed. Slice and enjoy!


Thursday, June 21, 2012

Snoozing in the Summer Sun

Unlike several of the other little kids I know, Addison is almost 18 months old and she still takes two naps a day. On one hand I consider myself very lucky, but it does mean that our daily activities are pretty limited. We can really only get out for a few hours in the middle of the day. So that means we either run some quick errands or go to the pool, but rarely do we get to do both.

Don't get me wrong - I love that I have two chunks in the day where I can do things without Addison underfoot. It makes getting dinner ready, or checking email, or just sitting down with a good book possible. I have numerous projects in the works at the moment, and although they are taking forever I know that they wouldn't be getting done at all if she didn't nap so much. I know I will be bummed when she finally gives up that morning nap.

Of course, there are days when I think she may be about done with both naps, but I'm hoping I still have some time. Twice this week she has refused to sleep in the morning, instead playing and then crying in her crib until I finally relent and go get her. At least I still get about 30 minutes before I go in and get her up, but it does screw with my mental schedule. I've come to count on those naps, and even though I'm rather busy while she's asleep, my mental batteries are charging nonetheless. When she doesn't sleep, my batteries run down and it throws everything off for the rest of the day.

And since one of those single nap days was today, I can't wait to go out for a girls night tonight. Hopefully she won't give Derek too much grief while I'm out.


Here's my great gazpacho soup recipe. It's perfect for a hot summer day when you want something cold and refreshing. I usually make some cheesy garlic bread to go with it. And it may seem like a complicated recipe, but really it's just a lot of fresh veggies all diced together.


Gazpacho Soup
1 1/2lbs tomatoes (approx 5)
1 cup Tomato juice (or V8)
1 cup cucumber (peeled, seeded, diced)
1/2 cup diced bell pepper
1/2 cup diced red onion
1 small jalapeno, seeded and minced
1 garlic clove (mince or use a garlic press)
1/4 cup extra-virgin olive oil
1 lime, juiced
2 tsp  balsamic vinegar
2 tsp  Worcestershire sauce
1/2 tsp  ground cumin
1 tsp salt
1/4 tsp black pepper
2 Tbsp fresh basil leaves, cut into ribbons


1. To prepare the tomatoes - Fill a pot halfway full of water and bring to a boil.  Make an X with a paring knife on the bottom of each tomato.  Drop the tomatoes into the boiling water for 15 -30 seconds, remove and transfer to an ice bath and allow to cool for 1 minute. Remove, peel, core and seed the tomatoes.

2. Place the tomatoes and tomato juice into a large mixing bowl. Add the cucumber, bell pepper, red onion, jalapeno, garlic clove, olive oil, lime juice, balsamic vinegar, Worcestershire, cumin, salt and pepper and stir to combine.

3. Use a hand blender (immersion blender) and puree mixture. You can leave some chunks or make it a fine puree depending on your preference.

4. Cover and chill for 2 hours and up to overnight. Serve with chiffonade of basil.  And some cheesy garlic bread, of course!


Friday, June 1, 2012

Great California Adventure

Sorry about the delay in posting - we just spent the last week in California and that meant things were kinda crazy before we left. Given that I spent 10 years in Cali, not to mention that Derek was born there,  we have a lot of friends and family to see when we go. Unfortunately this trip was so crazy that we barely got to see anyone. We did have fun though!

Addison did great on the flights out - even though we had layovers in both Dallas and El Paso on our way to LAX. I think she much prefers morning flights, and despite all the traveling we still got there mid-afternoon. Amidst the wedding planning (Derek's sister Sarah got married on Saturday), we had a chance to visit with the family for a bit before wedding prep took over.

And like all weddings, this one had its fill of crazy stress moments as everything came together. And come together it did - the venue was a park in Carpinteria, which was beautiful and had perfect weather on Saturday. The flowers were gorgeous (as was the bride), the cake (a tower of cake pops) delicious, and Addison charmed everyone with her dancing style even if she didn't quite make it down the aisle as the flower girl.

Then early Sunday morning Derek and I left Addison with Nanna and G-Pops and hopped in the car up to San Francisco. Thankfully we didn't hit any traffic and made it on time to the next wedding of the weekend; this time for his college roommate Simon. They had chosen to get married on a chartered boat in the middle of the San Francisco Bay - and they couldn't have asked for better weather. Sunny, warm, and no fog!

The wedding was fun, being on a boat, and did I mention the fireworks? It happened to be the 75th anniversary of the Golden Gate Bridge this weekend, so Sunday night they closed the bridge and turned it into one of the most spectacular fireworks shows we've ever seen. Fireworks shooting up, sideways, and down from the entire length of the bridge; it was very exciting to be right in front watching.

So after all that, it was kinda tough to drive back down south. At least we got a chance to visit with some friends for breakfast in Berkeley, and then at a couple of stops along the drive back. It was tough though - driving past so many people we know and love, and not having the time to see them. It was  torturous, and I just hope that our next California adventure let's us visit everyone we missed this time.

Now we are back home for a brief time before heading off again. The local schools are out for the summer, and it's been really hot here (my poor plants are mad at me for not watering them much while we were gone). So in honor of the hot weather and the beginning of another hot and sticky summer in the South, I'm sharing my recipe for sweet tea. We tend to drink it year-round, but never seem to have enough in the summertime.

CC's Southern Sweet Tea

5 Lipton tea bags
8 - 12 cups of water (it's not exact, just whatever fits in a pot)
1 cup sugar

1. Place all 5 tea bags in a large pot. Add water to about 1/2 inch from the top

2. Bring to a boil. Turn heat off and add sugar. Stir. Let tea cool, stirring every few minutes to make sure the sugar dissolves completely.

3. Once cool enough to pour into your pitcher, do so. Then add water to fill.

Pretty simple, and oh so satisfying. Enjoy!